What Cricut Do You Need to Make Shirts
Learn how to brand an easy T-shirt with a Cricut! This is a peachy projection for beginners and I show you how to do it footstep past step.
One of the reasons many people buy a Cricut is to be able to make T-shirts! And it's like shooting fish in a barrel to see why — the Cricut is perfect for T-shirt making, as it cuts out atomic number 26-in vinyl blueprint like a champ. My Impress Then Cut Fe on Transfer T-Shirt tutorial is a big hitting and my centre mandala shirt also draws a big audience! These tin can exist a petty challenging for beginners. So I desire to dial it back a bit and practice a very easy tutorial on how to make a T shirt with a Cricut for yous!
A couple of months ago I did a total-color Print Then Cut Iron on Transfer T-Shirt tutorial which was a big hit, simply print and then cutting can be a lilliputian challenging for beginners. And then I want to dial information technology back a bit and do avery easy tutorial on how to make a T shirt with a Cricut with you!
For this project, we'll be working with atomic number 26 on vinyl, also known every bit heat transfer vinyl, or HTV. Iron on vinyl is a special type of vinyl that has a oestrus sensitive adhesive that will stick to fabric and other surfaces when pressed downwardly with a heat source like an fe or an EasyPress. I will bear witness you how to use BOTH in this video.
Now the cool affair about the Cricut is that you can cut out a design or name from atomic number 26-on vinyl of various colors, patterns, and textures to create a uniquely personalized design. And if you practise it right, your shirt can be automobile washed up to 50 times before you start to have issues. I will show yous the RIGHT fashion to do it in this video so you get nifty results the start time!
Because the matter is, there'southward a bunch of things that tin can go wrong the first time you brand a shirt. Yous need to remember to mirror, or FLIP, the pattern, put the vinyl on your cutting mat with the right side up, weed the correct office of the pattern, preheat your shirt first, set your temperature right, press long enough, and remove the carrier sheet at the correct time. The adept news is I'll be correct hither with yous while y'all make your shirt to make certain you do information technology right!
Here is a full step-past-step video tutorial on how to Make an Iron-On T Shirt with a Cricut:
Permit'south start with the supplies you need and then I'll evidence you how to prepare an atomic number 26-on vinyl T-shirt design! This post contains some affiliate links for your convenience (which means if you make a purchase after clicking a link I will earn a pocket-size committee merely it won't cost yous a penny more)!Read my full disclosure policy.
Materials Needed to Make an Fe-On T-Shirt with a Cricut
- A cotton T-shirt
- Iron-on vinyl
- Weeding tool – the Cricut basic tool set is my favorite 1 to use for projects like this
- StandardGrip cutting mat
- Cricut TrueControl Knife or craft knife
- A manner to press your vinyl onto your shirt, such as an EasyPress, household iron, or heat printing
- A way to cutting your vinyl (I used the astonishing Cricut cutting machine!)
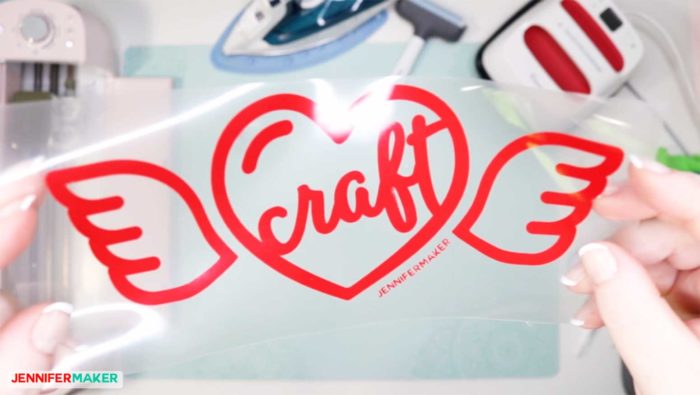
- Design #151 – My costless craft heart SVG cut file (bachelor in my gratuitous resource library—get the countersign at the lesser of this mail service)
How to Make an Iron-On HTV Design for a T-Shirt with a Cricut
Step i: Detect or Make Your T-Shirt Design
Go to Cricut Pattern Space, click on New Projection, then click on Templates in the upper left corner. Choose "Classic T-Shirt" and pick a mode, size and color. The template will aid you size your design so it looks good on your T-shirt.

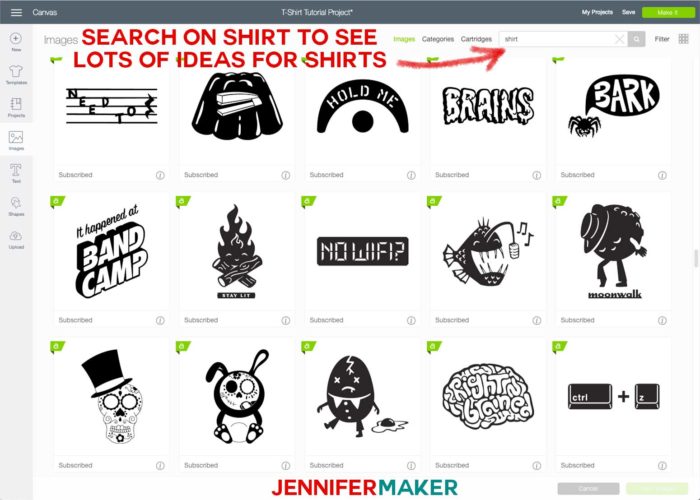
You'll find many designs for iron-on T-shirts right in Cricut Blueprint Space. Click on Images and browse the Image library for ideas. If you're a beginner, I recommend you stick with unproblematic, ane-color designs that do not have lots of pocket-size detail.
If y'all want to employ my gratuitous Craft Heart design I used in this tutorial (Design #151), you tin can download the free SVG cut files from my free resource library. Information technology'due south available equally both a PDF (for manus cutting) and an SVG/DXF (for car cutting). If you're going to cut information technology out on your cut machine, upload the file to your design software. If you're non sure how to upload an SVG cut file to Cricut Design Space, scout this helpful video preparation serial I fabricated.
IMPORTANT NOTE: If you're not sure how to upload an SVG file to Cricut Pattern Infinite, or y'all're having issues (such as getting a message that says "unsupported file"), delight watch my gratuitous training serial, SVGs Fabricated Uncomplicated. It will help you Then much!
Hither's what my "Arts and crafts" design file looks like uploaded to Cricut Blueprint Infinite:
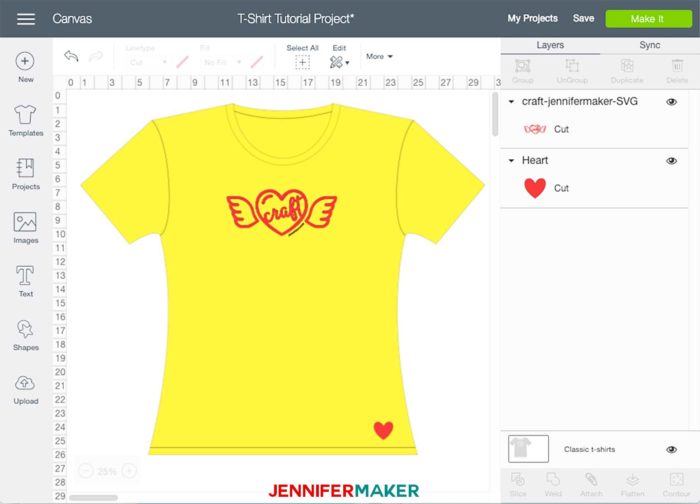
You can resize the image to fit the T-shirt by using the resize handle in the lower right corner — just click and elevate.

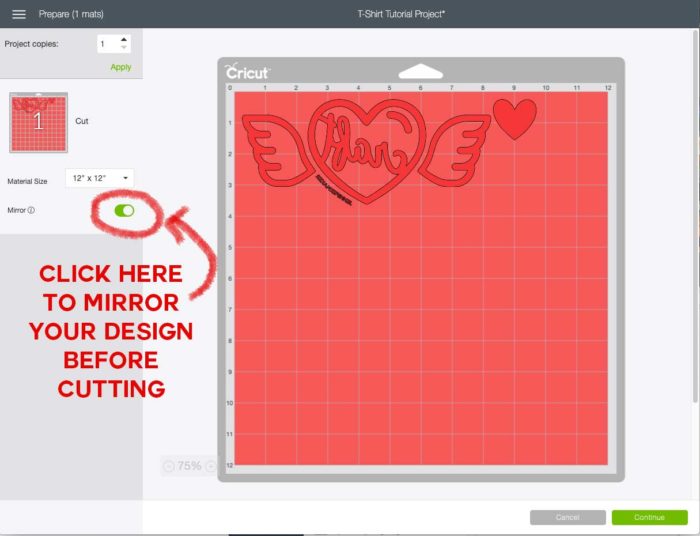
When you are ready, click the green Brand It push button in the upper right corner. Yous must and so toggle the MIRROR to on (green) — all fe-on designs must exist mirrored before cut!
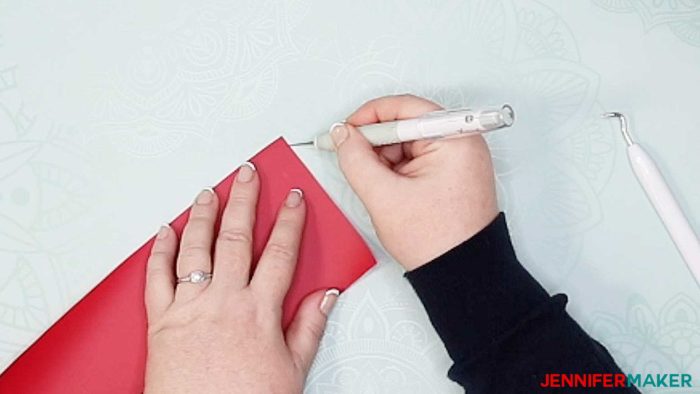
Footstep two: Cut Out Your Design in Iron-On Vinyl (HTV) on Your Cricut
Information technology's super important you lot put your fe-on vinyl SHINY SIDE Downward on your cut mat. Learn how to tell which side to cutting fe-on vinyl in my tutorial here!
See video for more than details!
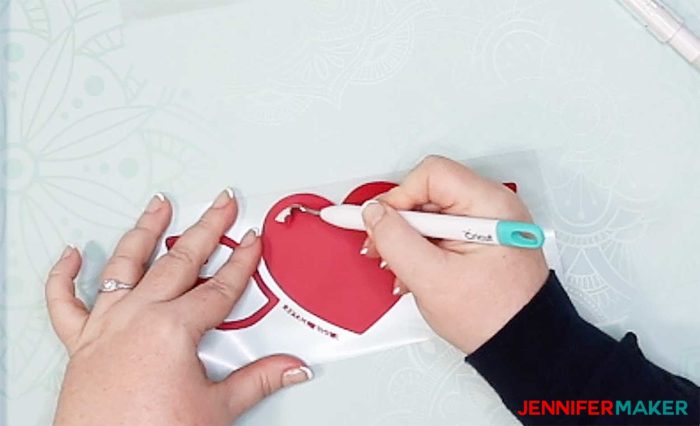
Step 3: Weed Your Atomic number 26-On T-Shirt Pattern
Information technology's now time to weed our atomic number 26-on design. So weeding ways to remove all of the vinyl that we don't want transferred to our project when nosotros iron it on or use a heat printing. And then that means we remove all the extra petty $.25.
To get started, you desire to begin peeling the vinyl away from the edge. Alas, the vinyl never actually wants to come complimentary very easily. So what I exercise is make a small knick in the corner with my craft knife. You don't want to cutting all the mode through. Merely cut through the iron on vinyl layer on the matte side (the cut side). And then it's easier to peel off once you lot've made that cut, I find. So I have simply knicked the corner right here:
And now I can go my fingernail under the edge of the vinyl easier because of that footling knick. If y'all take whatever bug, you can use your weeding tool to kind of pull it abroad like this. Once you have information technology started, you merely continue to pull it abroad from the carrier canvas. And your design volition stay on the carrier sheet and the part that you exercise not want volition pull away, just like this.
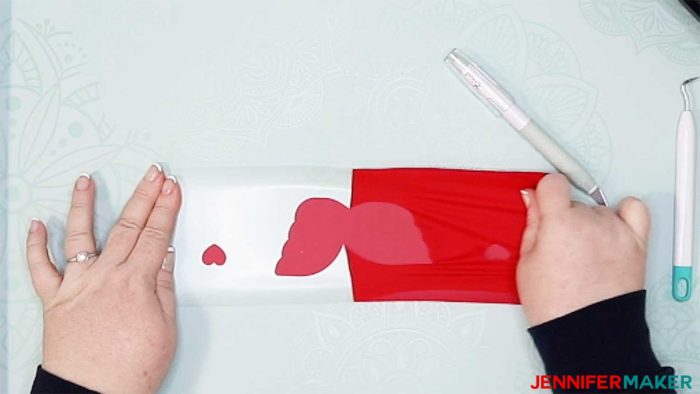
At present if you await at information technology your fe-on blueprint, you'll encounter that not all of it has been removed, right? So nosotros've got the parts inside the heart and the wings, and the letters also.
Tip: Always continue your little scraps off to the side, away from your work area so that they don't become mixed in with other things.
You just be patient and if you need to, you could use your tweezers to go the little bits off without hurting the letters. Here we have weeded our whole pattern.
Come across video for details!
Step 4: Transfer Your Design to Your T-Shirt
Showtime, if you are using a Cricut EasyPress, refer to the Cricut EasyPress Interactive Quick Reference Guide which will tell you how to prep your material and EasyPress, how to apply and how to treat the finished production. This takes the guesswork out of the procedure. You can view the guide at jennifermaker.com/easypress.
If you are using an iron, you'll want to preheat your fe to the cotton setting or the appropriate setting for your material.
Position your design on your shirt. For this project we want to centre it on the front. To find the middle of your shirt, fold it in half by matching up your sleeves. Using your EasyPress or iron, put a little crease on the fold. Now, when you open your shirt y'all know exactly where the center is because at that place is a crease. Just line up the eye of the heart with the crease. I too cull to put the design in the top half of the shirt.
Preheat your t-shirt, then put your design in place.
Oestrus the design using your iron using medium pressure or for the EasyPress apply gentle force per unit area.
If your transfer sheet is sticking to your iron, y'all can cover your blueprint with parchment paper to protect the surface of your iron.
For this project, my design was larger than my EasyPress. So I had to slide my EasyPress over to oestrus the blueprint in two sections.
Per the EasyPress Heat Guide, I had to plough the shirt over and apply force per unit area to the dorsum.
Wait and let the design cool to a warm temperature. And then pull the carrier sheet off your design.
Delight exist sure to check the Cricut website for the awarding instructions for your material. For Everyday Iron-On, view the settings here.
Watch our video to encounter this footstep in particular!
Step v: Take Care of Your New T-Shirt
To learn the proper way to care for your new shirt, allow 24 hours after applying your vinyl earlier washing. Plough your shirt inside out earlier washing without bleach. This design should least at least 50 washes.
You tin view the care guide at jennifermaker.com/easypress.
See video for details!
Answers to Your Questions Well-nigh Making Iron-On T-Shirts
Q: Why is my vinyl design pulling away from my shirt when I endeavour to pare the carrier canvass?
A: This could happen for a couple different reasons. Commencement, it could be a petty too soon to pull information technology abroad and y'all'll desire to permit the design cool down a piffling scrap more and so endeavor again. If that still doesn't work, heat the blueprint a little chip more. Those are typically the two reasons it isn't working.
Q: I heard that I'm supposed to encounter the texture/fibers of my shirts through my atomic number 26 on vinyl; is this correct?
A: From my testing, the only time that I tin go the fibers to show is when I practical also much heat. My enquiry shows that y'all don't always have to see the texture for information technology to be applied correctly. If my vinyl is practical correctly, I tin can feel the texture of the fabric when I run my hand over the design, but I cannot see the texture.
Q: Is it bad to overheat my design?
A: Yes, too much oestrus volition harm the adhesive and crusade your design to peel after you wear or wash it.
Q: Can I combine and layer colors of vinyl or dissimilar vinyls?
A: Yes, you lot can! Just so long as yous don't try to put anything over Glitter, Mesh or Flocked Vinyl. I have a tutorial on layering iron-on vinyl if yous're ready to take your projects to the next level. Read my Layered Iron-On Vinyl Tutorial and learn to make a Cute Totebag.
Q: Is there another fashion I can pattern my t-shirts and then it lasts longer?
A: Yes, I suggest using Infusible Inks if you want a longer lasting design. I have a Cricut Infusible Ink T-Shirt tutorial you lot might savor!
Go my costless "Craft" SVG cut files for your T-shirt
If y'all make a shirt with your Cricut, please share a photo in my helpful Cricut Facebook group or tag me on social media with #jennifermaker.
Love,

Desire to call back this? Salve the How to Make a Shirt with your Cricut Tutorial to your favorite Pinterest board!

Source: https://jennifermaker.com/make-t-shirt-cricut/
0 Response to "What Cricut Do You Need to Make Shirts"
ارسال یک نظر