How to Upload Pictures From Phone to Google Earth
Have you ever wished yous could testify people where on a map your photographs were taken? Wouldn't it exist bully if you could use a calculator-based mapping program to do this? Well, y'all can. With Google World, a digital camera and an inexpensive GPS receiver, you tin create and display moving picture locations, and with a little typing you can add together pictures and descriptive text that volition display when you click on the picture's location. You lot can then save these information in a specially formatted KMZ file that you tin can east-mail to colleagues, friends, or family and so they likewise tin view the pictures in Google Earth.
Some Examples

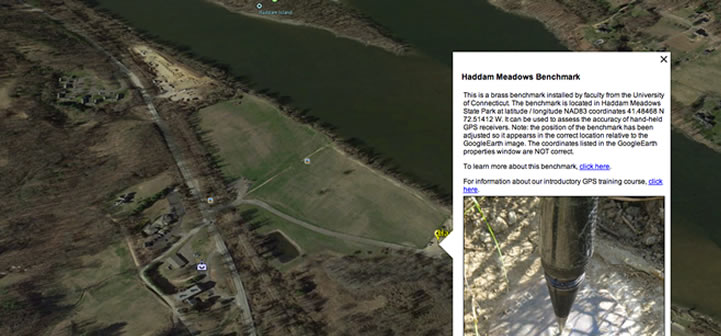
A pop-up window with picture(s) and text appears when a user clicks on a placemark in Google Globe.
If you have Google Earth Version iv or higher installed on your computer, you can encounter a KMZ in action.
Google Earth will commencement and volition "fly" to a benchmark located in the Haddam Meadows State Park in Connecticut. Once the flying stops, click on the screen icon and a picture show and some descriptive text volition pop up. (Important Note: Earlier versions of Google Earth may wing you to the location but volition not brandish the pictures.)
Interested in another example? Try browsing these pictures of plant communities at the Ragged Stone Creek stagnant tidal marshnear the rima oris of the Connecticut River.
Getting Started
OK, so are you lot gear up to attempt this? You are going to demand some basic equipment and software to go started:
- GPS receiver (any unit that displays your location in breadth/longitude will work)
- Digital camera and cables to download pictures to your computer
- Broadband Net connection
- Computer with Google World Version 4 (or afterwards)
- Field notebook (something to record your picture numbers and their corresponding GPS locations)
To get some data to work with, have the GPS, camera, and notebook and head out to an interesting location. In the field plough on the GPS unit and permit it determine its location. Take a picture. In the notebook tape the GPS latitude and longitude and the picture number. You will use these information back in the office to prepare Google Earth to wing to your motion-picture show locations. Now walk to another location, take a movie, and record the data. You lot tin continue to collect GPS coordinates and pictures until yous accept several to work with.
Back in the function, download your pictures to a binder on your computer. The binder name is not important – but you do demand to know its exact proper name (e.k., E:\Pictures4GE\) and you will need to know the exact filename of each motion picture.
Placemarks
In Google Earth, signal locations are called placemarks. When yous click on a placemark, information about it will exist displayed in a pop-upwardly window. Each placemark has editable properties that control how information technology is displayed and what data appears in the pop-upwards window. These properties include:
- a name that displays on the map as a characterization
- a display symbol
- the placemark's location in latitude and longitude
- information (text, picture, etc.) that displays in a pop-up window when you click on the placemark
- the coordinates for the heart of the map display
- other properties that control characterization size, way and color, view angle, and several other parameters
Creating a Placemark
In this stride you volition create a placemark and and so edit its coordinates to friction match a location where you took a picture.
Make sure Google Earth is open up. At this indicate, the geographic location that is displayed makes no difference. Click on the Add Placemark tool (it is a yellow pushpin icon near the tiptop of the Google Globe window). A xanthous placemark, surrounded past a flashing yellow box, volition exist added to the center of the view and a window titled Google Earth – New will open.
In the Google World – New window, replace the values in the Latitude and Longitude boxes with the latitude and longitude values for one of your picture locations. This will move the placemark to your coordinates, which may be somewhere off the view. Note: You lot can enter latitude and longitude values in a variety of formats – DD MM SS.SSS degrees minutes and decimal seconds, DD.DDDD decimal degrees, DD MM.MMMM degrees and decimal minutes, etc. You also can use North, Southward, E, and W to identify management, or you tin employ a negative sign to point longitudes west of Greenwich and latitudes south of the equator; however you need to be consequent.
- For example: 41 24 40.62N / 72 26 25.53W is the same every bit 41 24 40.62 / –72 26 25.53.
To reposition the map display (the view) to your placemark's location, click on the View tab and then click on the Reset button. This volition reposition the view so it is centered on the placemark. Now you can zoom in or out using the zoom slider bar in the height right corner of the Google Globe display. Yous likewise can change the view's tilt and/or compass orientation. Later on you accept the view set the way y'all want, click on the Snapshot current view button. This volition save the view as a holding of the placemark.
In the Proper noun box, enter a meaningful name for your placemark.
In the Description box, you can add some text that describes the picture, the location or anything else that you consider of import. Annotation: If you are familiar with HTML tags, you tin utilize many of them to control how the text appears in the pop-up window. You also can add together URLs to Spider web pages that automatically volition exist interpreted as a hyperlink.
Click the OK push to accept your edits. Yous should now be able to click on the placemark and the text you entered will be displayed in the popular-upwardly balloon.
Go ahead and add together several more placemarks and edit the breadth and longitude (remember to edit it in the main window and on the View tab).
Calculation a Picture to the Pop-up Window
Including a picture in the pop-upward window is a uncomplicated task simply it does crave the utilize of some HTML tags.
To add a moving picture, you demand to edit a placemark'southward properties. To do this, right click on the placemark on the map (or on the placemark name in the Places window on the left side of Google Earth). A pop-upwardly menu will appear. Move the mouse over Properties and click with the left mouse push. You tin at present edit the placemark's description to include an HTML tag for the digital picture.
In its simplest grade the HTML tag looks similar this:
-
- <IMG SRC="C:\GoogleEarth_Pictures\YourPicture.jpg">
In the above example, the tag includes the pathname to a digital motion picture on the C: drive.
Annotation: Y'all also could use a picture stored on an Internet server. In that example the HTML IMG tag would look something like this:
-
- <IMG SRC="http://www.yourserver.edu/Images/YourPicture.jpg">
You besides can include other tags that command the display peak and/or width (in pixels) of the picture show. However, you need to exist conscientious that if you specify both superlative and width that the values are such that they maintain the correct aspect ratio for the picture show or it will be stretched in one management relative to the other. A safer approach would exist to just specify a width or a pinnacle value but non both.
-
- <IMG SRC="C:\GoogleEarth_Pictures\YourPicture.jpg" width="320″ superlative="240″>
Then lets try this. Correct click on a placemark and select Backdrop on the popular-up menu. In the placemark's Description box add, after whatever text you have already entered, the following:
-
- <p><IMG SRC="driveletter:\the complete pathname to the folder that contains your digital pictures\the proper noun of the picture that y'all want to display" width="400″>
Annotation: the <p> HTML tag used above is like a new paragraph. It forces the moving-picture show to be displayed below the text you entered rather than later on it.
Organizing and Saving Your Placemarks
Once yous accept created and edited your placemarks, you will be ready to save your work. Your placemarks will be listed in the Places section on the left side of the Google World brandish in the My Places folder. Yous can add together a new folder to My Places and then move your new placemarks to it. The screen capture below illustrates how to create a new folder. Right click on My Places and so move the mouse over Add and click Folder… . In the Google Earth – New window that opens, type in the proper name of the folder you want to create and click the OK push. A new folder will be added to My Places. Correct click on any of your placemarks and while holding down the mouse button, elevate the placemark into the new folder. Keep doing this until all your placemarks have been moved into the new folder.

Right click My Places and you can add a folder to move your placemarks into.
When y'all close Google World, the contents of the My Places binder will exist saved and will be at that place the next time yous open Google Earth.
Distributing Your Placemarks
If you desire to share your placemarks and associated pictures, you can save them in a specially formatted KMZ file that yous can e-postal service to others, copy to CD or link to from a Web folio (this is what was done back at the starting time of the commodity).
To create a KMZ, right-click on the name of the folder that contains your placemarks and click on Salve As… on the pop-up bill of fare. In the Save file… window, navigate to a folder, enter a proper name for the KMZ and then click the Save push button. It'south that simple. You can now e-mail the KMZ to a colleague or friend and all they accept to exercise, assuming they have Google World 4.0 or higher, is double click on the KMZ file and Google World will open up and load the placemarks and pictures.
If your KMZ file is really big, information technology will exist meliorate if you save it to a CD then transport them the CD. every bit a notation, the size of the KMZ will be a role of the number of pictures and their sizes. If you are using a loftier-resolution camera, you might desire to reduce the size of the pictures earlier yous link to them through the placemarks you add together to Google Earth. Then, when yous create the KMZ, it will be much smaller.
A really good gratis paradigm display and editing program that lets you resize digital pictures is IrfanView. You should check it out if you need to reduce the size of your pictures.
Source: https://mapasyst.extension.org/how-to-geotag-and-display-pictures-in-google-earth/
0 Response to "How to Upload Pictures From Phone to Google Earth"
ارسال یک نظر